
Introduction
প্রিয় পাঠক, ইতিপূর্বে PART-3 এ আমরা HTML Body Tag Element কি? সে বিষয়ে জেনেছি , তা ছাড়া আমরা HTML Headings, Paragraphs এবং Lists সম্পর্কে বিস্তারিত জেনেছি। আজকের পর্বে আমরা HTML Link, Image, Text Formatting, div এবং span এর ব্যবহার জানব। চলুন শুরু করা যাক:
Link Tag Element
Link এর আভিধানিক অর্থ সংযুক্ত করা। অর্থাৎ একটা ওয়েব পেজের সাথে অন্য একটা পেজকে যুক্ত করাই হল LInking। HTML এ Linking টা করা হয় tag দিয়ে। আর যার সাথে লিংকআপ টা করা হবে সেটা tag এর href attribute এর মধ্যে দিতে হয়। যেমন: Link Text or Image or Video আর এই লিঙ্কিং তা তিন ধরণের হতে পারে।
- Inpage Linking
- Internal Linking
- External Linking
চলুন উপরের তিন প্রকার লিংক সম্পর্কে জানা যাক:
- Inpage linking হচ্ছে সাধারণত পেজ এর মধ্যে বিভিন্ন পজিশন বা ট্যাগ এর সাথে লিংকআপ করা। যেমন : <a href=”#middle”>Go Middle</a> অর্থাৎ , একই পেজ এর middle নামক id এর সাথে লিংকআপ করা।
- Internal Link হচ্ছে একই সার্ভার এর এক পেজ এর সাথে অন্য পেজ এর লিংকআপ করা। যেমন : <a href=”test.php”>Go Test Page</a> অর্থাৎ , একই Server এর test.php নামক পেজ এর সাথে লিংকআপ করা।
- External Link হচ্ছে ভিন্ন কোনো সার্ভার এর যেকোনো পেজ এর সাথে লিংকআপ করা। যেমন : <a href=”http://www.example.com/test.php”>Go Test Page</a> অর্থাৎ , example.com Server এর test.php নামক পেজ এর সাথে লিংকআপ করা।
Image Tag Element
ওয়েব পেজে ইমেজ বা ছবি যুক্ত করার জন্য প্রয়োজনীয় ট্যাগটি হচ্ছে <img> । এর কোন শেষ ট্যাগ নেই। শুধুমাত্র <img> দিয়ে কোন কাজ হয় না, এর সাথে সবসময়ই src এট্রিবিউটটি ব্যবহার করতে হয়। যেমন <img src=”pic.png”> , তাহলে pic.png ইমেজটি প্রদর্শিত হবে। <img> tag এ src attribute ছাড়াও আরো আছে alt attribute যা দিয়ে আপনি image কোনো কারণে না পেলে অল্টারনেটিভ একটা লেখা দেখতে পারেন। এ ছাড়া width এবং height attribute দিয়ে ইমেজ এর width এবং height সেট করতে পারবেন।
পূর্ব প্রস্তুতি
ডেক্সটপে একটা web নামে folder নিতে হবে এর মধ্যে pic.png নামে save করা একটা ছবি রাখতে হবে।
উদাহরণ
<!DOCTYPE html>
<html>
<head>
    <title>Image Tag Example</title>
</head>
<body>
    <h3> This is an example of image.</h3>
    <img src="pic.png" alt="Sample Image" width="500" height="500">
</body>
</html>
Output
This is an example of image.

Map and Area Input Control
Image এর বিভিন্ন অংশে ক্লিকেবল বা link করার জন্য <map> এবং <area> tag দুটি ব্যবহৃত হয়। <area> tag টি তে মূলতঃ image এর coordinate গুলো ডিফাইন করতে হয়। তবে এক্ষেত্রে আপনাকে প্রথমে <img> এর usemap attribute এ একটা নাম বলে আসতে হবে , চলুন একটা উদাহরণ দিয়ে দেখা যাক।
<!DOCTYPE html>
<html>
   <head>
      <title>HTML Image mapping and area</title>
   </head>
   <body>

<img src="http://satech360.com/wp-content/uploads/2020/03/bangladesh.png" usemap="#image-map">

<map name="image-map">
    <area target="_blank" alt="Rangpur Division" title="Rangpur Division" href="https://en.wikipedia.org/wiki/Rangpur_Division" coords="48,78,24,67,10,55,17,35,32,19,29,3,56,16,73,23,104,45,108,29,119,52,120,79,115,100,104,113,89,112,56,92" shape="poly">
    <area target="_blank" alt="Rajshahi Division" title="Rajshahi Division" href="https://en.wikipedia.org/wiki/Rajshahi_Division" coords="49,162,38,163,18,153,4,136,13,118,29,113,32,98,61,101,83,108,106,112,112,128,113,145,112,159,113,180,105,193,99,195,47,170" shape="poly">
    <area target="_blank" alt="Mymensingh Division" title="Mymensingh Division" href="https://en.wikipedia.org/wiki/Mymensingh_Division" coords="117,139,110,120,109,106,124,93,155,103,191,106,211,135,187,143,171,152,171,164,149,162" shape="poly">
    <area target="_blank" alt="Sylhet Division" title="Sylhet Division" href="https://en.wikipedia.org/wiki/Sylhet_Division" coords="215,184,209,157,211,132,191,105,224,104,257,104,282,111,290,121,262,154,250,170" shape="poly">
    <area target="_blank" alt="Dhaka Division" title="Dhaka Division" href="https://en.wikipedia.org/wiki/Dhaka_Division" coords="120,257,93,199,86,182,113,188,119,163,119,135,158,159,176,160,179,147,213,133,211,163,167,213,164,238,161,249" shape="poly">
    <area target="_blank" alt="Khulna Division" title="Khulna Division" href="https://en.wikipedia.org/wiki/Khulna_Division" coords="77,344,58,255,61,239,47,232,50,218,38,202,48,169,89,191,123,263,127,281,121,315,109,336,120,327" shape="poly">
    <area target="_blank" alt="Barisal_Division" title="Barisal_Division" href="https://en.wikipedia.org/wiki/Barisal_Division" coords="129,329,122,311,127,262,157,254,175,263,182,284,180,307,167,326,141,333" shape="poly">
    <area target="_blank" alt="Chittagong Division" title="Chittagong Division" href="https://en.wikipedia.org/wiki/Chittagong_Division" coords="279,402,260,377,250,348,251,323,242,296,232,275,226,292,198,311,173,309,173,256,163,231,183,195,210,169,239,249,255,200,274,201,286,261,296,301,296,345,300,370" shape="poly">
</map>
   </body>
</html>
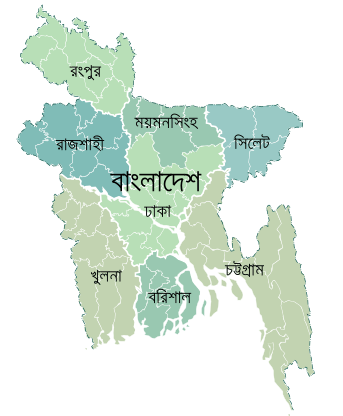
ব্যাখ্যা: উপরের ম্যাপ এর যেকোনো ডিভিশন এর উপর আপনি মাউস ক্লিক করলেই সংশ্লিষ্ঠ ডিভিশন এর wiki পেজ এ আপনাকে নিয়ে যাবে।
Picture Tag
কম্পিউটার এর ভিন্ন ভিন্ন রেজুলেশন এর জন্য ভিন্ন ভিন্ন image প্রদর্শনের জন্য <picture> </picture> ট্যাগ ব্যবহৃত হয়। চলুন একটা উদাহরণ দিয়ে ব্যাপারটা বুঝে নেয়া যাক :
<!DOCTYPE html>
<html>
   <head>
      <title>HTML Picture Tag</title>
   </head>
   <body>
   <picture>
  <source media="(min-width: 650px)" srcset="http://satech360.com/wp-content/uploads/2020/01/redrose.jpg">
  <source media="(min-width: 465px)" srcset="http:/satech360.com/wp-content/uploads/2020/01/bluerose.jpg">
  <img src="http://satech360.com/wp-content/uploads/2020/01/pinkrose.jpg" alt="Flowers" style="width:auto;">
</picture>
   </body>
</html>

ব্যাখ্যা: এখন যদি আপনার ব্রাউজার এর inspect Element এ গিয়ে responsive check করেন তাহলে ছবি তিনটির স্বয়ংক্রিয় পরিবর্তন দেখতে পাবেন।
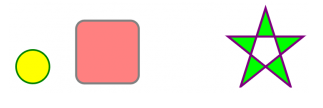
SVG Tag
ওয়েবসাইটে svg ইমেজ তৈরী জন্য <svg> ব্যবহৃত হয়। চলুন একটি উদাহরণ দিয়ে বুঝে নেয়া যাক :
<!DOCTYPE html>
<html>
   <head>
      <title>HTML SVG Tag</title>
   </head>
   <body>
   <svg width="100" height="100">
      <circle cx="50" cy="50" r="40" stroke="green" stroke-width="4" fill="yellow" />
   </svg>
   <svg width="400" height="180">
  <rect x="50" y="20" rx="20" ry="20" width="150" height="150" style="fill:red;stroke:black;stroke-width:5;opacity:0.5" />
</svg>
<svg width="300" height="200">
  <polygon points="100,10 40,198 190,78 10,78 160,198"
  style="fill:lime;stroke:purple;stroke-width:5;fill-rule:evenodd;" />
</svg>
   </body>
</html>
Output
Text Formatting Element
Microsoft Word এ Bold, Italic, Underline, strikethrough, Subscript, Superscript ইত্যাদি টেক্সট ফরমেটিং এর কথা নিশ্চয় আপনাদের মনে আছে ? HTML এর ক্ষেত্রেও Microsoft Word এর মত টেক্সট ফরমেটিং এর কাজ গুলো করা যায়। HTML এ টেক্সট ফরমেটিং এর জন্য <b>, <i>, <u>, <strike>, <sub>, <sup>, <big>, <small>>, <strong>, <samp>, <tt>, <abbr>, <var>, <code>, <address> ইত্যাদি ট্যাগ সমূহ ব্যবহার করা হয়। চলুন সব গুলো Text Formatting কে একটা উদাহরণ দিয়ে দেখা যাক :
<!DOCTYPE html>
<html>
<head>
    <title>Text Formatting Tag Example</title>

</head>
<body>
    <p>
        <b> (Bold)</b> This is an example of bold. <br />
        <i>(Italic)</i> This is an example of Italic. <br />
        <u> (Underline) </u> This is an example of Underline. <br />
        <strike>(Strike) </strike> This is an example of Strike. <br />
        (CO<sub>2</sub>) This is an example of Subscript. <br />
        (E=MC<sup>2</sup>) This is an example of Superscript. <br />
        <big>(Big text)</big>This is an example of Big. <br />
        <small>(Small text)</small>This is an example of Small. <br />
        <strong>(Strong text)</strong>This is an example of Strong. <br />
        <samp>(Sample text) </samp>This is an example of Sample. <br />
        <tt>(Teletype)</tt>This is an example of Teletype. <br />
        (<abbr> U.N.O</abbr> United Nations Organization.) This is an example of Abbreviation. <br />
        (<var>x</var> is a variable.)This is an example of Variable <br />
        (<code>Computer code text.</code>) This is an example of Code.<br />
        <address>
            (Written by Sahab Uddin<br />
            E-mail:sahabuddinriyaj984@gmail.com)</address>This is an example of Address <br />
        </p>
</body>
</html>
Output
(Bold) This is an example of bold.
(Italic) This is an example of Italic.
(Underline) This is an example of Underline.
(Strike) This is an example of Strike.
(CO2) This is an example of Subscript.
(E=MC2) This is an example of Superscript.
(Big text)This is an example of Big.
(Small text)This is an example of Small.
(Strong text)This is an example of Strong.
(Sample text) This is an example of Sample.
(Teletype)This is an example of Teletype.
( U.N.O United Nations Organization.) This is an example of Abbreviation.
(x is a variable.)This is an example of Variable
(Computer code text.) This is an example of Code.
E-mail:sahabuddinriyaj984@gmail.com)This is an example of Address
HTML div
div মানে Division, একটা অংশ বা ভাগ। এইচটিএমএল পেইজের একটা সেকশন। এইচটিএমএল ইলিম্যান্টকে বিভিন্ন গ্রুপে ভাগ করার জন্য div ট্যাগ ব্যবহার করা হয়। আর বিভিন্ন ভাগে ভাগ করার প্রধান উদ্যেশ্য হচ্ছে ভিন্ন ভিন্ন স্টাইল দেওয়া। div ডিফল্ট রূপে একটার নিচে আরেকটা বসে , তবে আপনি চাইলে স্টাইল শিট ব্যবহার করে div যেকোনো ভাবে সাজাতে পারেন। নিচে Div দিয়ে একটা সাধারণ লেআউট এর উদাহরণ দেওয়া হলো, আর div নিয়ে আমরা CSS পর্বে বিস্তারিত জানব। তো চলুন উদাহরণটি দেখা যাক :
<!DOCTYPE html>
<html>
<head>
    <title>HTML Div</title>
    <style>
        #header {
            display:block;
            background-color:#BBC;
            height:10%;
            width:100%;
            font-family:Arial;
            text-align:center;
        }
        #nav {
            height:200px;
            background-color:purple;
            width:30%;
            float:left;
            color:#FFF;
        }
        .main {
            float:right;
            width:100%;
            height:80%;
            }
    #footer {
        width:100%;
        height:10%;
        background:#000;
        color:#fff;
        position:relative;
        clear:both;
        padding: 10px;
}
   </style>

</head>
<body>
     <div id="header"><h1>This is a header</h1></div>
    <div id="nav"><h2>This is Sidebar</h2></div>
    <div class="main"></div>
    <div id="footer"><p>This is Footer</p></div>
</body>
</html>
Output
This is a header
HTML span:
div ডিফল্ট রূপে একটা আরেকটার নিচে বসে , অর্থাৎ আপনি যদি কোনো টেক্সট লাইনের মধ্যে নির্দিষ্ট অংশকে CSS Style করার জন্য একাধিক div ব্যবহার করেন , দেখবেন একটা div আরেকটা div এর নিচে বসে সংশ্লিষ্ট লাইনটিকে ভেঙে দিবে। এবং এক লাইনে আন্তে হলে আপনাকে আলাদা করে আবার CSS লিখতে হবে। আর এই কাজটি আপনি span দিয়ে করলে এই ধরণের সমস্যা হবে না। মূলত span ব্যবহার করা হয় একটা লাইনের মধ্যের একটা নির্দিষ্ট অংশে CSS Style করার জন্য। নিচের উদারনটি দেখুনঃ
<!DOCTYPE html>
<html>
<head>
    <title>HTML Span</title>
</head>
<body>
     <p>This is a <span style="color:red;font-weight:bold">Example of span tag</span>. The span tag is used to inline-elements CSS in a document. </p>

  </body>
</html>

</body>
</html>
Output
This is a Example of span tag. The span tag is used to inline-elements CSS in a document.