
Overflow কি? CSS এ কখন Overflow Property ব্যবহৃত হয়?
যখন কোন কনটেন্ট তার area থেকে বাহিরে চলে যায় অর্থাৎ উপচে পড়ে তখন এটাক overflow বলে। আর overflow কনটেন্টকে ক্লিপ করার জন্য বা স্ক্রলবার যুক্ত করার জন্য অথবা শুধু কন্টেন্টকে প্রদর্শন করানোর জন্য সিএসএস overflow প্রোপার্টি ব্যবহার করা হয়।
CSS overflow প্রোপার্টিতে নিম্নোক্ত ভ্যালুসমূহ ব্যবহৃত হয়।
- overflow: visible; – ডিফল্ট ভ্যালু। এখানে overflow ক্লিপ হয় না এবং কন্টেন্ট বক্সের বাইরে প্লাবিত হয়।
<!DOCTYPE html>
<html>
<head>
<style>
div.ex4 {
  background-color: lightblue;
  width: 110px;
  height: 110px;
  overflow: visible;
}
</style>
</head>
<body>
<h2>overflow: visible (default):</h2>
<div class="ex4">Lorem ipsum dolor sit amet, consectetuer adipiscing elit, sed diam nonummy nibh euismod tincidunt ut laoreet dolore magna aliquam erat volutpat.</div>
</body>
</html>
Output
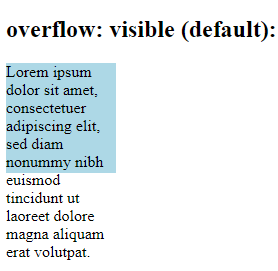
- overflow: hidden;– overflow ক্লিপ হয় এবং কনটেন্টের বাকি অংশ অদৃশ্য হয়ে যায়। উদাহরণটি দেখুনঃ
<!DOCTYPE html>
<html>
<head>
<style>

div.ex2 {
  background-color: lightblue;
  width: 110px;
  height: 110px;
  overflow: hidden;
}

</style>
</head>
<body>
<h2>overflow: hidden:</h2>
<div class="ex2">Lorem ipsum dolor sit amet, consectetuer adipiscing elit, sed diam nonummy nibh euismod tincidunt ut laoreet dolore magna aliquam erat volutpat.</div>
</body>
</html>
Output
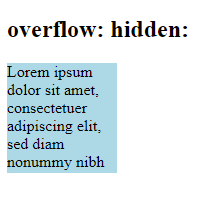
overflow: scroll; – overflow ক্লিপ হয় এবং স্ক্রলবার যুক্ত হয়, যা দ্বারা স্ক্রল করে কনটেন্টের বাকি অংশ দেখা যায়। উদাহরণটি দেখুনঃ
<!DOCTYPE html>
<html>
<head>
<style>
div.ex1 {
  background-color: lightblue;
  width: 110px;
  height: 110px;
  overflow: scroll;
}
</style>
</head>
<body>

<h2>overflow: scroll:</h2>
<div class="ex1">Lorem ipsum dolor sit amet, consectetuer adipiscing elit, sed diam nonummy nibh euismod tincidunt ut laoreet dolore magna aliquam erat volutpat.</div>

</body>
</html>
Output
overflow: scroll:
- overflow: auto;– ব্রাউজার সয়ংক্রিয়ভাবে overflow ক্লিপ করে এবং স্ক্রলবার তৈরি করে। উদাহরণটি দেখুনঃ
<!DOCTYPE html>
<html>
<head>
<style>
div.ex3 {
  background-color: lightblue;
  width: 110px;
  height: 110px;
  overflow: auto;
}
</style>
</head>
<body>
<h2>overflow: auto:</h2>
<div class="ex3">Lorem ipsum dolor sit amet, consectetuer adipiscing elit, sed diam nonummy nibh euismod tincidunt ut laoreet dolore magna aliquam erat volutpat.</div>
</body>
</html>
Output
overflow: auto:
overflow প্রোপার্টির গ্লোবাল ভ্যালুসমূহঃ
- overflow: inherit;
- overflow: initial;
- overflow: unset;
বিঃদ্রঃ শুধুমাত্র নির্দিষ্ট উচ্চতা(height) সম্বলিত এলিমেন্টের ক্ষেত্রে overflow প্রোপার্টিটি প্রযোজ্য।
CSS overflow-X এবং overflow-Y
CSS এ overflow-X এবং overflow-Y প্রোপার্টি overflow কনটেন্টকে পাশাপাশি /উপরে নিচে অথবা উভয় ভাবে পরিবর্তন করে। অর্থাৎ overflow-X দ্বারা কনটেন্টের বাম অথবা ডান প্রান্তে কি হবে তা নির্ধারণ করে। এবং overflow-Y দ্বারা কনটেন্টের উপর বা নিচ প্রান্তে কি হবে তা নির্ধারণ করে।
কন্টেন্টের লেআউট সঠিকভাবে নিয়ন্ত্রণ করতে চাইলে overflow প্রোপার্টিটি ব্যবহার করলে অনেক সুবিধা পাওয়া যায়।
চলুন একটা উদাহরণ দিয়ে ব্যাপারটা বুঝে নেয়া যাক:
<!DOCTYPE html>
<html>
<head>
<style>
div.ex1 {
  background-color: lightblue;
  width: 40px;
  overflow-x: scroll;
}

div.ex2 {
  background-color: lightblue;
  width: 40px;
  overflow-x: hidden;
}

div.ex3 {
  background-color: lightblue;
  width: 40px;
  overflow-x: auto;
}

div.ex4 {
  background-color: lightblue;
  width: 40px;
  overflow-x: visible;
}
</style>
</head>
<body>

<h1>The overflow-x Property</h1>

<p>The overflow-x property specifies whether to clip the content, add a scroll bar, or display overflow content of a block-level element, when it overflows at the left and right edges.</p>

<h2>overflow-x: scroll:</h2>
<div class="ex1">Lorem ipsum dolor sit amet, consectetuer adipiscing elit...</div>

<h2>overflow-x: hidden:</h2>
<div class="ex2">Lorem ipsum dolor sit amet, consectetuer adipiscing elit..</div>

<h2>overflow-x: auto:</h2>
<div class="ex3">Lorem ipsum dolor sit amet, consectetuer adipiscing elit...</div>

<h2>overflow-x: visible (default):</h2>
<div class="ex4">Lorem ipsum dolor sit amet, consectetuer adipiscing elit...</div>

</body>
</html>
Output
The overflow-x Property
The overflow-x property specifies whether to clip the content, add a scroll bar, or display overflow content of a block-level element, when it overflows at the left and right edges.
overflow-x: scroll:
overflow-x: hidden:
overflow-x: auto:
overflow-x: visible (default):
CSS এ Float কি?
সাধারণতঃ HTML এ যেকোন ব্লক লেভেল এলিমেন্ট ব্রাউজারের বা থেকে ডানে শেষ পর্যন্ত জায়গা দখল করে থাকে যার ফলে ব্লক লেভেল এলিমেন্টের পাশে অন্য আরেকটা ব্লক লেভেল এলিমেন্ট ঢোকেনা। এতে ব্লক লেভেল এলিমেন্টগুলি একটির নিচে আরেকটি বসে। তবে CSS float ব্যবহার করলে HTML Element গুলো কনটেন্ট পরিমান জায়গা নিয়ে বাকি জায়গা সে অন্য floated এলিমেন্টের জন্য ছেড়ে দিবে। সহজ কথায় HTML Element গুলিকে পাশাপাশি আনতে CSS Property float ব্যবহৃত হয়। float দিয়ে এলিমেন্ট গুলিকে পাশাপাশি (আড়াআড়িভাবে) বা side-by-side বসানো যায়। float সবসময় আড়াআড়িভাবে কাজ করে। HTML Layout তৈরীর সময় কোন div এর পাশে কোন div হবে তা ঠিক করার জন্য CSS Float ব্যবহৃত হয়।
চলুন CSS float property এর value গুলো সম্পর্কে সংক্ষেপে জানাযাক:
- float:left – এর মাধ্যমে element টি তার কন্টেইনার এর left এ থাকে।
- float:right– এর মাধ্যমে element টি তার কন্টেইনার এর right এ থাকে।
- float:none – অর্থাৎ float হবেনা। এটি হচ্ছে float এর ডিফল্ট অবস্থা।
- float:inherit – এর মাধ্যমে parent এর float এর অবস্থা ইনহেরিট করবে।
float: left; এর ব্যবহারঃ
<!DOCTYPE html>
<html>
<head>
<style>
img {
  float: left;
  padding:5px;
}
p{
text-align:justify;


}
</style>
</head>
<body>
<p style="text-align:justify;">
<img src="http://satech360.com/wp-content/uploads/2020/04/mango-150x150.jpg" alt="Mango" style="width:225px;height:225px;">
Lorem ipsum dolor sit amet, consectetur adipiscing elit. Phasellus imperdiet, nulla et dictum interdum, nisi lorem egestas odio, vitae scelerisque enim ligula venenatis dolor. Maecenas nisl est, ultrices nec congue eget, auctor vitae massa. Fusce luctus vestibulum augue ut aliquet. Mauris ante ligula, facilisis sed ornare eu, lobortis in odio. Praesent convallis urna a lacus interdum ut hendrerit risus congue. Nunc sagittis dictum nisi, sed ullamcorper ipsum dignissim ac. In at libero sed nunc venenatis imperdiet sed ornare turpis. Donec vitae dui eget tellus gravida venenatis. Integer fringilla congue eros non fermentum. Sed dapibus pulvinar nibh tempor porta. Cras ac leo purus. Mauris quis diam velit.lobortis in odio. Praesent convallis urna a lacus interdum ut hendrerit risus congue. </p>

</body>
</html>
Output

ব্যাখ্যা:, লক্ষ্য করুন , ইমেজটি container box এর বামদিকে লেগে আছে এবং অনুচ্ছেদের লেখাগুলো ইমেজের ডান ডিকে আছে ।
float: right; এর ব্যবহারঃ
<!DOCTYPE html>
<html>
<head>
<style>
img {
  float: right;
  padding:5px;
}
p{
text-align:justify;


}
</style>
</head>
<body>
<p style="text-align:justify;">
<img src="http://satech360.com/wp-content/uploads/2020/04/mango-150x150.jpg" alt="Mango" style="width:225px;height:225px;">
Lorem ipsum dolor sit amet, consectetur adipiscing elit. Phasellus imperdiet, nulla et dictum interdum, nisi lorem egestas odio, vitae scelerisque enim ligula venenatis dolor. Maecenas nisl est, ultrices nec congue eget, auctor vitae massa. Fusce luctus vestibulum augue ut aliquet. Mauris ante ligula, facilisis sed ornare eu, lobortis in odio. Praesent convallis urna a lacus interdum ut hendrerit risus congue. Nunc sagittis dictum nisi, sed ullamcorper ipsum dignissim ac. In at libero sed nunc venenatis imperdiet sed ornare turpis. Donec vitae dui eget tellus gravida venenatis. Integer fringilla congue eros non fermentum. Sed dapibus pulvinar nibh tempor porta. Cras ac leo purus. Mauris quis diam velit.lobortis in odio. Praesent convallis urna a lacus interdum ut hendrerit risus congue. </p>

</body>
</html>
Output
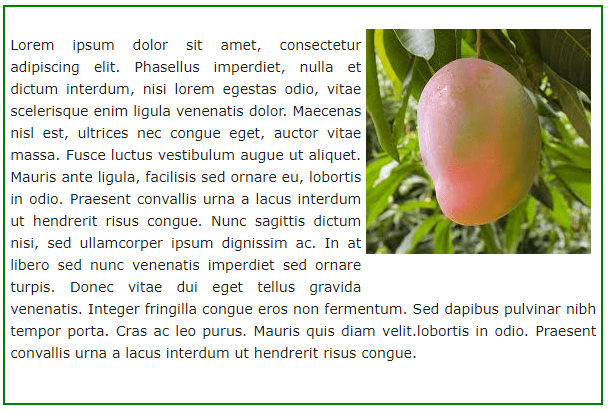
ব্যাখ্যা:, লক্ষ্য করুন , ইমেজটি container box এর ডানদিকে লেগে আছে এবং অনুচ্ছেদের লেখাগুলো ইমেজের বামদিকে আছে ।
float: none; এর ব্যবহারঃ
<!DOCTYPE html>
<html>
<head>
<style>
img {
  float: none;
  padding:5px;
}
p{
text-align:justify;


}
</style>
</head>
<body>
<p style="text-align:justify;">
<img src="http://satech360.com/wp-content/uploads/2020/04/mango-150x150.jpg" alt="Mango" style="width:225px;height:225px;">
Lorem ipsum dolor sit amet, consectetur adipiscing elit. Phasellus imperdiet, nulla et dictum interdum, nisi lorem egestas odio, vitae scelerisque enim ligula venenatis dolor. Maecenas nisl est, ultrices nec congue eget, auctor vitae massa. Fusce luctus vestibulum augue ut aliquet. Mauris ante ligula, facilisis sed ornare eu, lobortis in odio. Praesent convallis urna a lacus interdum ut hendrerit risus congue. Nunc sagittis dictum nisi, sed ullamcorper ipsum dignissim ac. In at libero sed nunc venenatis imperdiet sed ornare turpis. Donec vitae dui eget tellus gravida venenatis. Integer fringilla congue eros non fermentum. Sed dapibus pulvinar nibh tempor porta. Cras ac leo purus. Mauris quis diam velit.lobortis in odio. Praesent convallis urna a lacus interdum ut hendrerit risus congue. </p>

</body>
</html>
Output
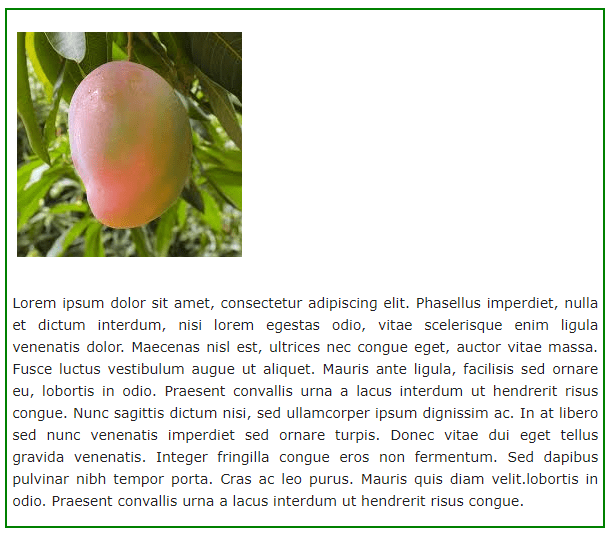
ব্যাখ্যা:, লক্ষ্য করুন , ইমেজটি container box এর বামদিকে লেগে আছে এবং অনুচ্ছেদের লেখাগুলো ইমেজের নিচে চলে আসছে।
CSS clear প্রোপার্টির কাজ কি?
সাধারণত যে সব html element এর উপর float ব্যবহৃত হয়েছে এই সব float element গুলোর কার্যকারিতা এর পরবর্তী HTML Element গুলো এর উপরে চলে আসে। তাই এটাকে এড়িয়ে যাওয়ার জন্য clear প্রোপার্টি ব্যবহার করা হয়। একটি এলিমেন্টকে ফ্লোটিং এলিমেন্টের কোন পাশে ফ্লোট হওয়া থেকে বাধা দেবে তা নির্ধারণের জন্য clear প্রোপার্টিটি প্রয়োগ করা হয়। সহজ কোথায় ফ্লোটিং এলিমেন্টের আচরণ নিয়ন্ত্রনের জন্য CSS clear প্রোপার্টি ব্যবহার করা হয়।
CSS clear Property তে নিম্নের value গুলো ব্যবহৃত হয়:
- none – Floating Element কে উভয়পাশে থাকার সুযোগ দেয়। এটা ডিফল্ট।
- left – Floating Element কে left side এ বসতে বাধা দেয়।
- right- Floating Element কে right side এ বসতে বাধা দেয়।
- both – Floating Element কে উভয়পাশে অর্থাৎ left side এবং right side এ বসতে বাধা দেয়।
- inherit – Parent Clear Element থেকে ইনহেরিট করে।
clear: left; এর ব্যবহারঃ
<!DOCTYPE html>
<html>
<head>
<style>
.div1 {
  float: left;
  width: 100px;
  height: 50px;
  margin: 10px;
  border: 3px solid #73AD21;
}

.div2 {
  border: 1px solid red;
}

.div3 {
  float: left;
  width: 100px;
  height: 50px;
  margin: 10px;
  border: 3px solid #73AD21;
}

.div4 {
  border: 1px solid red;
  clear: left;
}
</style>
</head>
<body>

<h2>Without clear</h2>
<div class="div1">div1</div>
<div class="div2">div2 - Notice that div2 is after div1 in the HTML code. However, since div1 floats to the left, the text in div2 flows around div1.</div>
<br><br>

<h2>With clear</h2>
<div class="div3">div3</div>
<div class="div4">div4 - Here, clear: left; moves div4 down below the floating div3. The value "left" clears elements floated to the left. You can also clear "right" and "both".</div>

</body>
</html>
Output
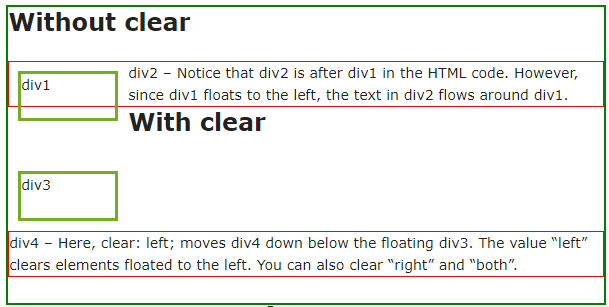
ব্যাখ্যা: লক্ষ্য div4 কে clear:left করায় এটি div3 এর মতো left div element এর উপর ওভাররাইড হয় নি।
CSS float এবং clear ব্যবহার করে একটা Web Layout তৈরী :
<!DOCTYPE html>
<html>
<head>
<style>
.header{
    width : 100%;
    background-color:#bc8;
    height: 100px;
}
.left_menu{
    width : 20%;
    float:left;
    background-color:#9c9;
    height: 250px;
}
.right_menu{
    width : 20%;
    float:right;
    background-color:#9c9;
    height: 250px;
}
.content{
   float: left;
   width: 60%;
    background-color:#eee;
   height: 250px;

}
.footer{
   width:100%;
    background-color:#000;
   height: 50px;
   color:#fff;
clear:both
}

</style>
</head>
<body>

<div class="header">Header</div>
  <div class="left_menu">Left Menu</div>
  <div class="content">Main Content</div>
  <div class="right_menu">Right Menu</div>
<div class="footer">Footer</div>
</body>
</html>
Output
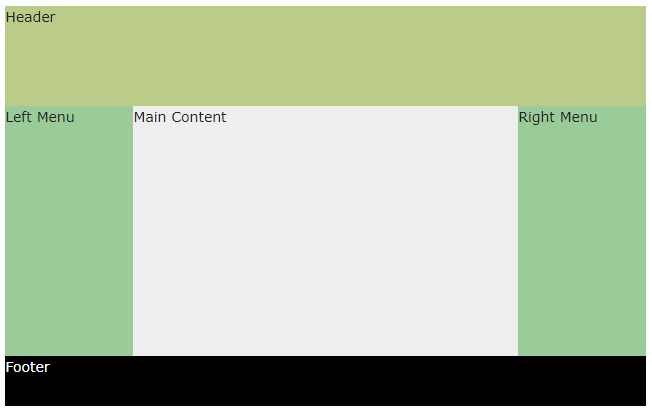
float এবং clear Property এর সাথে overflow: auto; এর ব্যবহার
একটি এলিমেন্ট যদি তার কন্টেইনারের চেয়ে বড় এবং ফ্লোটিং হয় তাহলে ঐ element টি তার কনটেইনার থেকে ওভারফ্লো ।আরেকটি এলিমেন্ট আকারে বড় হয় তাহলে বড় অংশটি কন্টেইনারের বাহিরে ওভারফ্লো করবে। এই সমস্যা সমাধাণের জন্য আমরা overflow: auto; ব্যবহার করতে পারি। নিচে উদাহরণ দেখুনঃ
<!DOCTYPE html>
<html>
<head>
<style>
div {
  border: 3px solid #4CAF50;
  padding: 5px;
}

.img1 {
  float: right;
}

.clearfix {
  overflow: auto;
}

.img2 {
  float: right;
}
</style>
</head>
<body>

<p>In this example, the image is taller than the element containing it, and it is floated, so it overflows outside of its container:</p>

<div>
  <img class="img1" src="http://satech360.com/wp-content/uploads/2020/04/mango-150x150.jpg" alt="Mango" width="170" height="170">
  Lorem ipsum dolor sit amet, consectetur adipiscing elit. Phasellus imperdiet, nulla et dictum interdum...
</div>

<p style="clear:right">Add a clearfix class with overflow: auto; to the containing element, to fix this problem:</p>

<div class="clearfix">
  <img class="img2" src="http://satech360.com/wp-content/uploads/2020/04/mango-150x150.jpg" alt="Mango" width="170" height="170">
  Lorem ipsum dolor sit amet, consectetur adipiscing elit. Phasellus imperdiet, nulla et dictum interdum...
</div>

</body>
</html>
Output
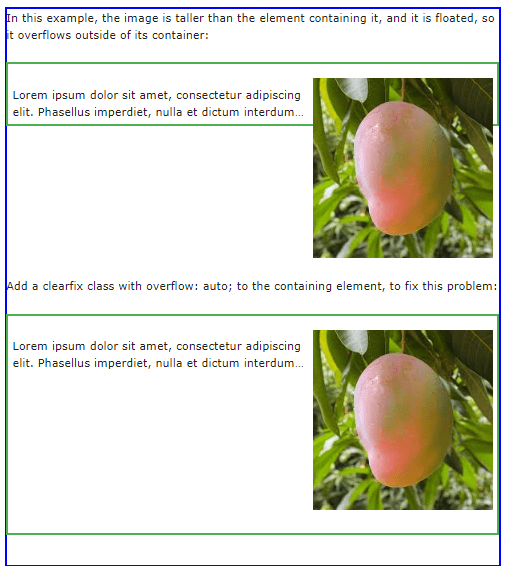
CSS box-sizing Property কি?
CSS বাই ডিফল্ট width + padding + border এই তিনটির সমন্বয়ে একটা element এর total width নির্ধারণ করে। আবার height+ padding + border এই তিনটির সমন্বয়ে একটা element এর total height নির্ধারণ করে। এখন যদি আপনি css padding এবং border কে টোটাল width অথবা height এর অংশ হিসেবে রাখতে না চান তাহলে আপনাকে CSS box-sizing property ব্যবহার করতে হবে। সহজ ভাষায় বলা যায় , CSS box-sizing property এর কাজ হচ্ছে css border এবং padding কে টোটাল width এবং height এর অন্তর্ভুক্ত করা। চলুন প্রথমে box-sizing property ছাড়া একটা উদাহরণ দেখা যাক :
<!DOCTYPE html>
<html>
<head>
<style>
.div1 {
  width: 300px;
  height: 100px;
  border: 1px solid blue;
}

.div2 {
  width: 300px;
  height: 100px;
  padding: 50px;
  border: 1px solid red;
}
</style>
</head>
<body>

<div class="div1">This div is smaller (width is 300px and height is 100px).</div>
<br>
<div class="div2">This div is bigger (width is also 300px and height is 100px).</div>

</body>
</html>
Output
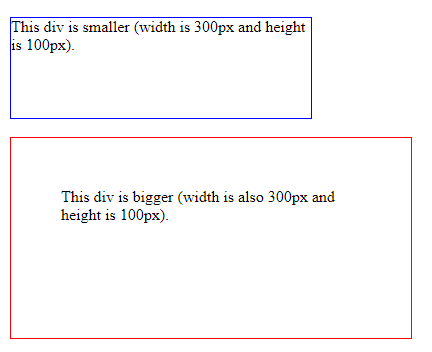
ব্যাখ্যা: লক্ষ্য করুন দুটি box এর width এবং height একই হয়ে সত্ত্বেও দ্বিতীয় box টি padding এর জন্য অনেক বড় দেখাচ্ছে।
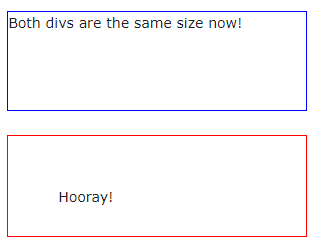
এখন এই সমস্যাটি আপনি css-boxsizing property দিয়ে খুব সহজেই সমাধান করতে পারেন। চলুন একটি উদাহরণ দিয়ে বুঝে নেয়া যাক:
<!DOCTYPE html>
<html>
<head>
<style>
.div1 {
  width: 300px;
  height: 100px;
  border: 1px solid blue;
  box-sizing: border-box;
}

.div2 {
  width: 300px;
  height: 100px;
  padding: 50px;
  border: 1px solid red;
  box-sizing: border-box;
}
</style>
</head>
<body>

<div class="div1">Both divs are the same size now!</div>
<br>
<div class="div2">Hooray!</div>

</body>
</html>
Output
CSS float, clear এবং box-sizing property ব্যবহার করে একটা grid তৈরী:
<!DOCTYPE html>
<html>
<head>
<style>
* {
  box-sizing: border-box;
}

.box {
  float: left;
  width: 33.33%;
  padding: 50px;
}

.clearfix{
  clear: both;
  display: table;
}
</style>
</head>
<body>
<h2>Grid of Boxes</h2>
<p>Float boxes side by side:</p>
<div class="clearfix">
  <div class="box" style="background-color:#bbb">
  <p>Some text inside the box.</p>
  </div>
  <div class="box" style="background-color:#ccc">
  <p>Some text inside the box.</p>
  </div>
  <div class="box" style="background-color:#ddd">
  <p>Some text inside the box.</p>
  </div>
</div>
</body>
</html>
Output
Output
Grid of Boxes
Float boxes side by side:


One response to “CSS TUTORIAL IN BANGLA PART-7: CSS Overflow, float, clear and box-sizing”
Very helpful
thank you sir